caldwellsaddle@windstream.net
3484 Prospect Rd.
Toccoa, GA 30577

TIPS & INFO
CALDWELL SADDLE - TOP TIPS
Questions? Give us a call at
706-886-0314
You can't spend a lifetime riding and studying the art and science of saddle making without learning a lot about horses, riders, and the equipment that they use. This section represents an effort to share what we've learned and to explain why Tom and Charon recommend certain types of equipment over others. Please read to find out about our trees, caring for your equipment, what's new, and the causes of white hairs and sore spots on your horse's back.

PHOTOGRAPHING YOUR HORSE FOR SADDLE FIT
The best way to take the shoulder shot is to sit on your horse's butt and take the picture down towards the withers.
Chiropractors are not saddle fitters and unfortunately neither are most saddle builders. But we can discover what we need for your horse with 4 pictures. Make sure the sun is behind you or chose a cloudy day.
Check the background to be sure you have a good contrast so the back is easily seen:
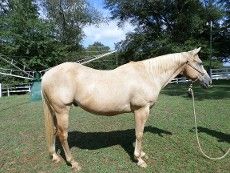
- Take side-view pictures of both sides, whole body, nose, toes, and tail; head in normal position.
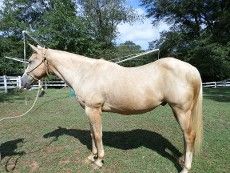
- Mount bareback and scoot back to the loin or hip area; take a pic down toward where the neck and shoulders meet (this gives the width of shoulders).
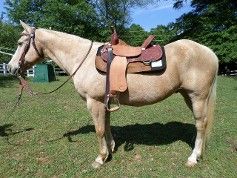
- Tack up w/ best fitting saddle, pad, breast collar; ride 15 mins then take another side view like the first.
Be sure to give age, height, and bloodline, if possible. Will need your phone number and a time to call when you can view the pictures on your computer.
CHANGES IN CONFORMATION
DUE TO "CORRECT SADDLE FIT"
We, here at Caldwell Saddle Company, have personally noted some interesting developments recently. A correct saddle that fits absolutely perfectly may not be the end of your saddle woes. Three months ago, our barrel racer employee found a nice five year old that fit under our TG Racer just right. Now, after working the mare 3-5 times a week, she has put on about a hundred pounds, obviously mostly muscle. She has gone up two saddle sizes and is now riding with our Rocket tree. I have long suspected that too narrow of a tree can restrict muscle and bone development much like a corset can cause a woman’s rib cage to bend inward, distorting the bone and muscle structure. So, although after waiting a year to receive your new Caldwell that fits perfectly, please keep an eye on the way it continues to fit. As well as our employee, we have had at least 4 other customers have this happen – that we know of. While this may be discouraging news because you thought you had solved your saddle fit problems, a responsible horseman has to keep a constant vigilance for the benefit of our four legged partners. All of us at Caldwell will work with our customers to properly re-fit your horses when this occurs. But, please be patient, we are custom builders with over a hundred saddle orders to work through. We do not have a production line.
CONCHO REPAIR OR REPLACEMENT
To tighten or loosen your conchos, place the pointed end of a screwdriver in a groove or ridge on the concho. Tap the handle end of the screwdriver with a hammer to turn the concho. Be careful not to over tighten and break it. See the picture below:

DON'T FORGET TO OIL AND CLEAN YOUR SADDLE!
CLEANING YOUR SADDLE and tack is imperative to the life of the leather. Remember that dirt and sweat is what rots leather and, after several years, will cause the breakdown and severe depreciation of your tack. With proper care and maintenance, your saddle could last a lifetime. To clean leather, we recommend using a lot of water and elbow grease combined with the glycerin soap of your choice and a stiff plastic bristled brush, such as a dish or fingernail brush. Be Sure To Rinse Away All Soap From Leather Before Leaving It To Dry! Keep in mind the wetter the leather, the easier the dirt will be to remove. Also, the dirtier your saddle, the longer it will take to get all of the dirt and sweat out. The most susceptible parts of the saddle are the inside of the fenders that are against the horse, the rig area, and the seat so take extra time to make sure you get these parts really clean. Be sure to scrub in circles using a lot of soap and water and wash ALL parts. When the saddle dries you will probably see some areas darker than others. The dark areas are still dirty and need more attention so go back at them with diligence! When you are confident that your saddle is clean, make sure to oil it well to preserve and condition the leather and prevent dirt and sweat from penetrating as badly next time. Generously oil ALL parts and sides, including roughout, but be sure to stay at least an inch away from suede seats if your saddle has this. We also recommend using Blackrock ($9.00) as a finishing for smooth leather and conditioner for the elk seats. Dilute it a little with water and rub it on with your hands, avoiding roughout and suede. It doesn't hurt to spray the mud, dirt, and sweat off of your saddle regularly as long as you oil it regularly.
OIL YOUR SADDLE AND OTHER LEATHER TACK AT LEAST EVERY 6 MONTHS TO PRESERVE IT'S LIFE! WE HAVE OUR OWN OIL MADE CALLED MIRACLE SADDLE OILTM ($41.95/gal) THAT PENETRATES DEEP INTO THE PORES OF THE LEATHER LIKE NO OTHER OIL AVAILABLE. WE RECOMMEND USING THE WOOL THAT WE SEND WITH IT TO APPLY THE OIL BECAUSE OF THE ADDED BENEFITS OF LANOLIN. THIS IS THE SAME WOOL THAT WE USE TO PROTECT HORNS WHEN WE SHIP SADDLES, SO KEEP IT, CUT IT TO DESIRED SIZE, AND USE IT AS AN OIL RAG. REMEMBER THAT OILED LEATHER BENDS, STRETCHES AND LASTS, WHILE DRY LEATHER TEARS AND BREAKS. PROTECT YOUR INVESTMENT AND STAY SAFE BY TAKING CARE OF YOUR TACK!!!!
After you have thoroughly cleaned and oiled your saddle, there are several products we recommend (and use) that you might want to use in order to further enhance the appearance and longevity of your saddle.
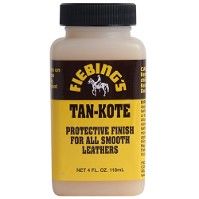

Tan-Kote is a great, lightweight polish for imparting a soft glow to all smooth and/or tooled leathers. If you are using it on older saddles that have been heavily oiled, a second coat may be necessary. Wait overnight after applying to first coat to determine if the second coat is needed. Sometimes, Tan-Kote will take several hours to develop its shine, this is normal. The benefit of Tan-Kote is that when used correctly, you are still able to oil through it.
Blackrock is more of a wax than a polish, and although it does give a glow, it also adds moisture to leather and makes it more supple. It has to be used sparingly in order to avoid stickiness. If it does get tacky, Blackrock is water and oil soluble, so simply wash or oil the saddle to remove any excess. We recommend that you fill the empty space in the container with water and shake well to mix. Blackrock can be mixed as much as 50/50 with water to dress leather. We do not apply it directly to leather, but dip out about 1/2 of a teaspoon and spread onto the palm of our hands and then rub into the leather. When applying to heavy floral toolings, we recommend that you dip a small fingernail brush into the mixture and press it into the tooling. After applying Blackrock, wipe the leather with a paper towel to remove any excess. NOTE: DO NOT use on suede or rough-out leather.
Urad is a scratch and scuff concealer. Although Blackrock may help with hiding them, Urad is more permanent and does a better job. It can be applied to the whole saddle using the supplied applicator, but as with Tan-Kote and Blackrock, use it sparingly. If your applicator becomes dirty or gummy, simply clean it with water.
IF YOU ARE INTERESTED IN LEARNING MORE ABOUT THESE PRODUCTS OR PURCHASING THEM FOR USE ON YOUR SADDLES, WE CARRY THEM IN STOCK AND WILL BE HAPPY TO ANSWER ANY QUESTIONS YOU HAVE.
OUR SHOP NUMBER IS (706) 886-0314
Bar saddlesoap and a med hard short bristled nylon brush and lots of water; soak the saddle w/ cool water before you start scrubbing to stop scratching the leather, do it out of the sun, rinse the dirty foam off often, it will take a long time and lots of soap foam and scrubbing to release the dirt from the INSIDE of the leather. Be sure to scrub the suede quilt too, all that black will come out and the suede will fluff back up like new, it is not worn just dirty. Work w/ a steel brush on the bottom backside of the fenders, again lots of water and foam; this is the only area where the leather drags over the sweaty horse body. Keep rinsing and raising foam till the water and foam are clean; then reshape and allow to dry in the shade, could take several days, then oil (our oil is the best but others will do) several coats each day. Leather will take it differently so keep oiling the light spots till all the same color, should be much darker than it is now, at this stage the finish won’t look great, but after oiling done, a light coat of Urad or a thin coat of Blackrock will restore shine.
DON'T FORGET TO OIL AND CLEAN YOUR SADDLE!
CLEANING YOUR SADDLE and tack is imperative to the life of the leather. Remember that dirt and sweat is what rots leather and, after several years, will cause the breakdown and severe depreciation of your tack. With proper care and maintenance, your saddle could last a lifetime. To clean leather, we recommend using a lot of water and elbow grease combined with the glycerin soap of your choice and a stiff plastic bristled brush, such as a dish or fingernail brush. Be Sure To Rinse Away All Soap From Leather Before Leaving It To Dry! Keep in mind the wetter the leather, the easier the dirt will be to remove. Also, the dirtier your saddle, the longer it will take to get all of the dirt and sweat out. The most susceptible parts of the saddle are the inside of the fenders that are against the horse, the rig area, and the seat so take extra time to make sure you get these parts really clean. Be sure to scrub in circles using a lot of soap and water and wash ALL parts. When the saddle dries you will probably see some areas darker than others. The dark areas are still dirty and need more attention so go back at them with diligence! When you are confident that your saddle is clean, make sure to oil it well to preserve and condition the leather and prevent dirt and sweat from penetrating as badly next time. Generously oil ALL parts and sides, including roughout, but be sure to stay at least an inch away from suede seats if your saddle has this. We also recommend using Blackrock ($9.00) as a finishing for smooth leather and conditioner for the elk seats. Dilute it a little with water and rub it on with your hands, avoiding roughout and suede. It doesn't hurt to spray the mud, dirt, and sweat off of your saddle regularly as long as you oil it regularly.
OIL YOUR SADDLE AND OTHER LEATHER TACK AT LEAST EVERY 6 MONTHS TO PRESERVE IT'S LIFE! WE HAVE OUR OWN OIL MADE CALLED MIRACLE SADDLE OILTM ($41.95/gal) THAT PENETRATES DEEP INTO THE PORES OF THE LEATHER LIKE NO OTHER OIL AVAILABLE. WE RECOMMEND USING THE WOOL THAT WE SEND WITH IT TO APPLY THE OIL BECAUSE OF THE ADDED BENEFITS OF LANOLIN. THIS IS THE SAME WOOL THAT WE USE TO PROTECT HORNS WHEN WE SHIP SADDLES, SO KEEP IT, CUT IT TO DESIRED SIZE, AND USE IT AS AN OIL RAG. REMEMBER THAT OILED LEATHER BENDS, STRETCHES AND LASTS, WHILE DRY LEATHER TEARS AND BREAKS. PROTECT YOUR INVESTMENT AND STAY SAFE BY TAKING CARE OF YOUR TACK!!!!
After you have thoroughly cleaned and oiled your saddle, there are several products we recommend (and use) that you might want to use in order to further enhance the appearance and longevity of your saddle.
MOLD ON LEATHER
Mold is a living breeding thing. Once the spores grow active in an area they will spread. Even if you wipe it off your tack, unless you treat the whole room or area, it will come back. If it is briefly on leather it will not hurt, however, long time exposure will cause scarring and pitting of the surface. Mold will NOT grow on overly dry, out of condition saddles and bridles. So if it is visible, then you are taking good care of your stuff by frequent oiling.
To remove, mix half and half mixture of Isopropyl alcohol and water; drip or sponge only all of the leather. Using the same mixture in a clean garden sprayer, spray walls and interior of storage area. You won't kill all the bacteria with the first treatment, but respraying every 3 months (or when mold reappears) will reduce it each time until it all dries.
FITTING PADS TO YOUR HORSE
After years of discussing and attempting to create the proper design for saddle trees, I have discovered another issue that can have adverse effects on both fit and performance....the pad.
I am only going to discuss 100% wool felt pads because others, such as air, gel, foam; I consider "gimmicks". All of these have too much give and can create sore spots. The protective layer can easily move aside under pressure leaving no protection from a high spot. If you can press your thumbs together from each side of the pad there is no protection for your horse. If you can push through the air, gel, foam; so can a pressure point on the underside of your saddle. Felt is much denser so it can disperse any pressure area.
A side view of the pad should match the spinal contour your horse. A low withered flat-backed horse often referred to as a Quarter Type is easier to fit because the shape of most pads match this type. See Example A. While the high withered low-backed Thoroughbred Type (Example B) has to have the same pad contour to match him, but there are very few pads for this type.
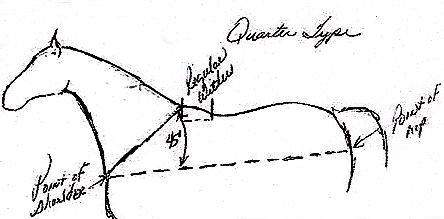
EXAMPLE A
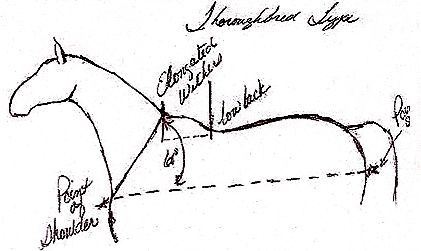
EXAMPLE B
Supreme Western Products had one a few years ago but I have not checked lately. Diamond Wool Pads has done one for us with an adjustable velcroed wither strap as well as an extra long cutback; which is great because the straighter the shoulder the lower the back and the longer the withers. I am seeing horses whose withers are as long as their backs.
Due to changes in conformations of racing and performance horses, saddles themselves have had to change. Adding to conformation changes, fitness levels will also alter whether the saddle sits level and balanced on the horses' back. "The more fit, the harder to fit." As well, pads should have had to evolve to work to equalize the pressure points on high withers, straight shoulders, and/or low backs, but they have lagged behind the better fitting saddles. Sometimes it may require a specialist to help get the customer the right combination of saddle and pad for their horse. Here at Caldwell Saddle we will work with our customers, giving all the information at our disposal. We offer evaluations of saddle, saddle tree, pad, fit, and usage.
CUT-BACK PADS
This horse has a back that can be considered 'weird' and hard to properly fit. As a result, he requires a custom saddle pad. He is extremely straight shouldered (about 80°), long withered, and low-backed.
When customizing a pad for this horse, the idea was to “make the back as normal as possible” with the use of either a Black Gold pad (by Diamond Wool), or one that was cut like it. There are instructions on the site that will walk you through modifying your saddle pad, look under the “Tips” section. I designed the Black Gold pad because there were not many pads that worked for a high withered and low-backed horse. This pad is designed to fill in the low back and go around (not over) the withers.
Why should you pad up another inch over withers that are already high? The adjustable wither strap on the Black Gold pad holds the pad in place without a build up of excess padding. From the front edge of the pad to the base of the original cut out is designed to measure 10 inches. I thought this would work for most horses with long withers and low backs, however, the bay in the picture above, “Scar”, has withers that measure 14 inches to the point where the withers and back meet. This long measurement means that he needs a deeper cut out in his pad in order to accommodate his withers.
Why is this important to do? If you have a crappy saddle with straight bars, it would not matter because only the outer edges of the bar will touch the horse and you will be sitting 6 inches above his back. But with the pad laying over the “blade” portion (the ridge between the highest point of his withers to where it joins the back) in a good, close contact saddle, the added thickness of the pad will cause the blade ridge to rub on the underside of the seat. By cutting this area out, it will add another inch of clearance. Any contact your saddle has with any area along the spine is detrimental to your horse. We have done this modification for dozens of horses, so it is not uncommon. The cut out amount is approximately 3 to 4 inches. Another issue with not cutting this area for those that need it is related to the slope of the wither blade. As he runs, the wither blade will hit the underside of the saddle and cause it to slide back, making folks think that it is the saddle that does not properly fit the horse.
These horses have a wither as long as their backs. So we have angled the front edge back to free up the neck adjoining the withers to stop mane rubbing and prevent the pad from being pushed back when the animal raises his neck and head. Also, we have cut the relief slot along the front of the spine to allow the extended blade portion to fit through the hole so the raised bone does not hit the underside of the ground seat and shove the saddle backwards.
MODIFYING PADS FOR NECK & MANE RELIEF
As you are aware from our previous discussion on straight shoulders and saddle placement, if your pad is too far back on your horse, you will put the saddle too far back. Of course, all pas do not fit all horses; but even when you properly fit the shape of the back, there can be other issues.
One of the primary ones is the pad hitting the neck. If there is too much pressure from the pad being too tightly against the neck when the animal raises it's head the neck will push the pad and saddle back.
Most western contour pads for flatter backed stock horse types nowadays have a slight mane relief angle cut at the front of the pad. This often is not cut out enough for horses with very straight shoulders. As the straighter the shoulder, the farther forward you will have to bring the pad. Your pad should be 4 inches in front of the top point of the shoulder to allow the front of the saddle to rest on that point. So the following drawing shows where to alter this needed neck/mane relief. This can be done by yourself, a shoe shop or a saddle company for very little investment.

This will not be necessary on our 10" and 13" cutback pads.We have already allowed neck/mane relief with them because most high withered, low backed horses are so straight in the shoulders those pads have this allowance. But those pads in general do not fit flatter backed horses due to them having too much curve in the top line shape which makes the tail of the pad stick up into the air. This does not hurt the horse, just looks ugly.
INSTRUCTIONS FOR MODIFYING A PAD
To help your saddle fit a low backed/high withered or uneven shouldered horse. We recommend using a 100% wool felt pad with a contoured back. This is only a guide, you must mark the areas on your pad specifically for your horse. The circles in pic 2 show approximately where the shoulder blades on a horse bulge (just below the wither). This is the same area where you might see white hairs or dry spots. Either of these symptoms are signs that your saddle is not fitting your horse properly. The pressure in this area needs to be reduced to alleviate or prevent pain. The three remedies are to move your saddle up, use a thinner or modified pad as shown below (which also fills in the back to allow the saddle to sit level), and/or get a saddle with a wider gullet. (Note that true gullet width cannot be measured with the saddle intact). These 100% wool felt pads are made in layers, so you can use a sharp knife to carve out the areas where the saddle pressure needs reduced. A large-toothed pair of clippers can be used to smooth/even out the cutout area (be sure to have a large can of "cool lube" and use frequently so you don't burn up your clippers). Until a quality pad is made to be thinner over a horse's shoulders and thicker over the back, most barrel/race-bred horse owners will have to resort to this technique, regardless of the saddle used, to keep the horse sound and the rider more balanced. We carry an economical line of these pads in 3/4" and 1".
Our newly designed by Caldwell, made by Diamond Wool, custom 1" 30x30 100% wool felt pads with extra cut-out for withers, adjustable wither strap, and more contour in the back.
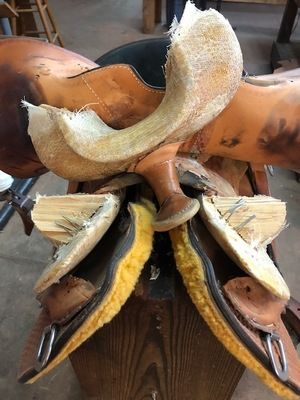
WHY ONE DOES NOT WANT FIBERGLASS TREES
Fiberglass trees are so weak that they cannot be used unless there is a ground seat added between the bars for strength. As you see from these pictures, it does not help much. This saddle picture is from the leading maker of cutting horse saddles.
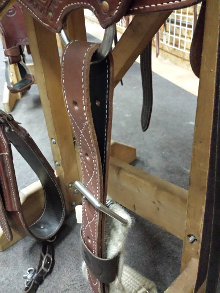
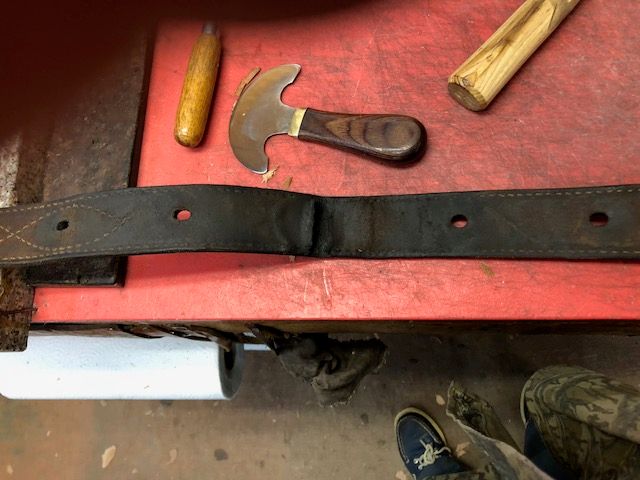
WARNING: WRONG TIE STRAP LACING
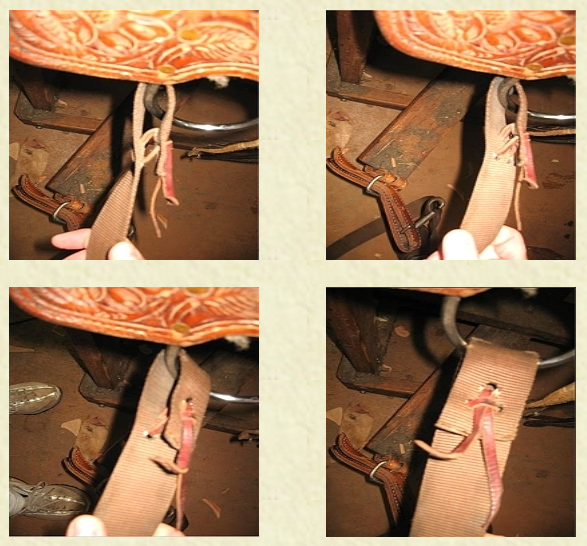
Folks,
The photos above were taken of a child's saddle sent to us for clean-up. Note the lacing had slid back and was mostly undone. This would have come completely undone during the next ride, possibly injuring the little girl
Lacing tie straps and billets properly is extremely important to us so we have diagrammed the proper methodology for this.
Please follow the correct procedure…your life could depend on it.
1) start with pointed tips cut on lace
2) go through bottom sets of holes, pull tightly, and hold leather together with your other hand while lacing

3) take both laces up and back through the single top hole, pull up tightly

4) at this point, some people will tell you to pass the loose ends down through the loop of lace between the bottom two holes – do not! This is very important not to lace this way. It will not stay tight and could cause the tie strap to slide off.

5) pass each of the loose ends back through the bottom holes so that the ends are again on the rear side
HINT: use an ink pen or narrow Phillips head screw driver to push through the holes to move the lace over and slightly stretch open the holes

6) to lock in place using your pen or screwdriver lift each loop a little and pass the loose end under the loop crossing sides, pull up tightly and cut no shorter than ¾”

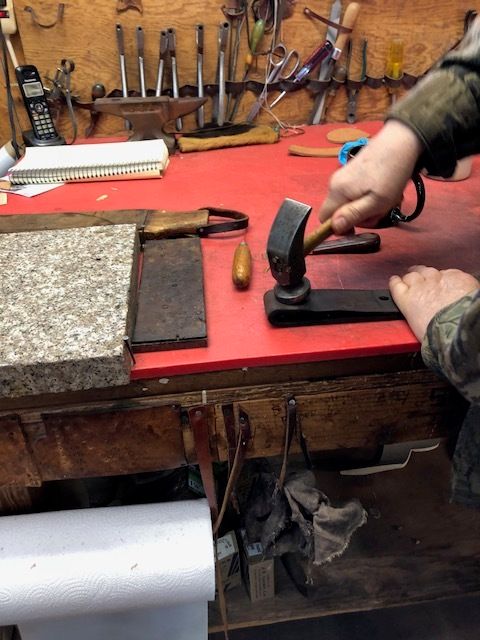
7) we like to hold something like a hammer head under the lacing and firmly tap the top lace with another hammer to lock the lacing in place
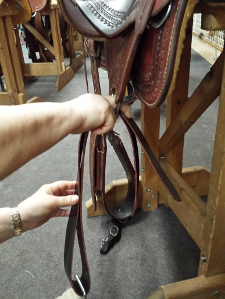
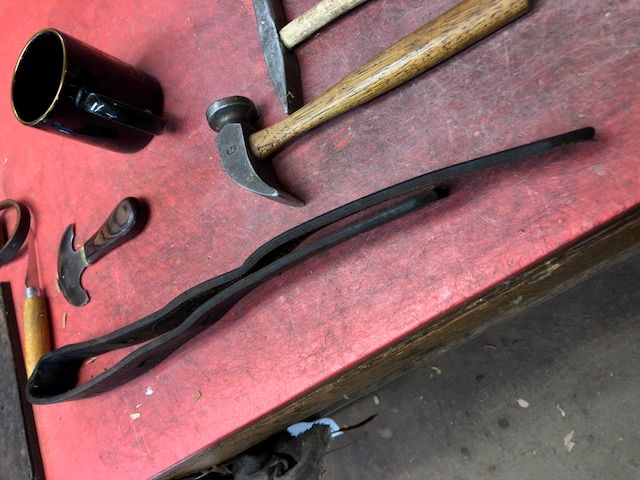
LATIGO HALFBREEDS vs OFF BILLETS
I saw a lady from Iowa almost killed at the NBHA World from an improperly hung latigo halfbreed. These are softer for the horses' comfort and longer for more adjustment on different sized horses. They are mostly used by trainers saddling lots of different sized animals from 2 - 8-year-olds.
PICTURE 1
Picture #1 shows a standard doubled & sewn, shorter off-billet which is hung over the saddle's front rigging on the off side; then both ends are passed through and buckled into the girth.
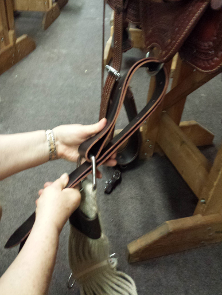
Picture #2 shows finished hanging latigo halfbreed. The following pictures show how to do this.
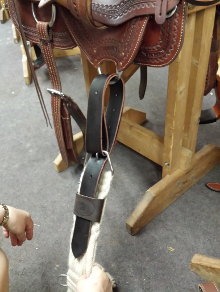
PICTURE 2

A
- NEVER cut these halfbreeds shorter and use as off-billets. Single ply around saddle riggings and girth buckles can break 1st time they are used.
- Safety comes from having double layers at riggings and triple layered at the girth.
- Always tuck ends into girth loop or pockets that are found on quality girths.
- NEVER use girths with chrome or nickle plated buckles because rust will unknowingly eat thru your girth.
- Squared off buckles will not wear out your ties & off-billets the horseshoe curved styles.
B
C

D
PROPER USE OF OFF BILLETS
A proper off billet will be made of durable Harness leather and can cost a pretty penny. For longest usage, off billets should never be laced onto the saddle D. They will wear out three times as fast as necessary. If you leave them loose, as the inside wears against the D or the outside wears against the stirrup leather, as shown in Pic #1
PICTURE 1
You can re-adjust to the next hole either up or down. Just re-fold it to align the holes, Pic #2
PICTURE 2
You may have to soak it and hammer down to flatter, Pic #3. It will look like Pic #2 when you re-hang onto D. Move every 6 months or so for longest use.
PICTURE 3
REGARDING BLACK SADDLES
We are often questioned about coloring or making saddles black. This is not something we recommend due to the overly dry condition created by the black dye that has to contain formaldehyde usage to set the pigment. We can offer a “near black” called Show Finish for those preferring that dark of saddle. This color looks better to most than true black; creating a more natural and less chemical look.
RIGHT
ADJUSTING YOUR FENDERS/LEATHERS
To raise or lower the length of the stirrup leathers, it is not necessary to remove the hobble straps, which means you are less likely to lose them. Riding without hobbles is extremely dangerous! Follow these steps for an easy solution:
There should always be only 1 or 2 fingers width at the bottom of the fender above the stirrups for the hobble strap.

WRONG
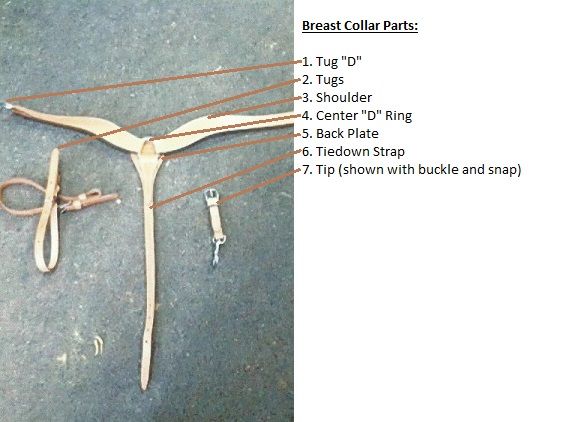
BREAST COLLAR FIT
Many individuals out there are having a real issue with how tightly the breast collar should be fastened and where its center should be placed. Let's start by saying that a breast collar cannot keep a saddle in place, regardless of what you have been told. It cannot keep the saddle on a horses shoulders. If your horse's conformation drops off or dips behind the shoulders; or if your saddle is too narrow in the gullet, falling behind is common; therefore, you have to address your saddle fit and/or your pad. But what you cannot do is tighten the breast collar tugs (the small straight straps attached to the shoulders straps and buckle to the saddle breast collar D's) thinking this will solve your saddle fit problems.
RIGHT
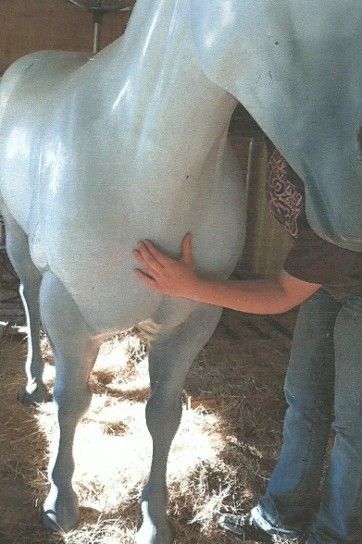
If you tighten the tugs, it will lift the center plate and ring (or D) into the horse's throat. The horse's windpipe is just under the skin where the base of the neck meets the center of the chest.
Feel your own chest to find the hard breast bone in the center, about four inches down from your throat. Do the same to your horse; this is where the center plate of the breast collar should rest. The slack should be taken out of the tiedown strap that goes to the forward small dee attached to your girth between the front legs, there should be no more than a hands width of slack in the tiedown. When there is excess slack, the collar can shift up during a run into the windpipe and cut off the horse's air, equivalent to the center plate being too high into his throat.
A horse acts as a giant bellows, which is why they run so effectively. When he hits full stride, he extends his leading leg and his neck. He inhales on this stride and exhales when he draws his neck and legs in (collects). How can he inhale with a breast collar that is too tight or too high? It can limit the air supply enough to slow his overall speed. I had a gelding, Cimmaron, in 1976 that taught me how much horses were effected by improper breast collar placement. I rode English at that time and used a Polo Strap, which is a straight breast collar that attaches to the sides of the saddle but does not have a tiedown strap. Everytime Cimmaron galloped, he bucked; because my breast collar placement was affecting his breathing, he was going to make it hard on me. When I finally figured it out and removed the offending collar, he was as good as gold. I had a customer, Stan Sullivan, in my shop the other day and he saw me working on this article and told me of an event he and his wife, Cheryl, witnessed on their group ride recently in Arizona. While stopping to water at a shallow creek, one gentleman's horse put his head down to drink while wearing a breast collar that was too tight. The horse passed out, falling over into the creek and nearly drowning. However, breast collars do not have to be too tight to cause problems. I had a good cutting mare, Haidas Cat Can Do, that I was holding by the reins, just after she had shown, my husband, Tom, our trainer, Mack Odom and I were on the way to the barn and stopped to look under a trailer. Cat took that opportunity to put her head down and snatch at the grass under the nearby fence. Suddenly she reared up and fell over, out cold! Lord, I thought she was dead! Mack started laughing and slapping his thigh, "She ain't dead, she just choked herself down. She'll be up in a minute. I've had them do that before."
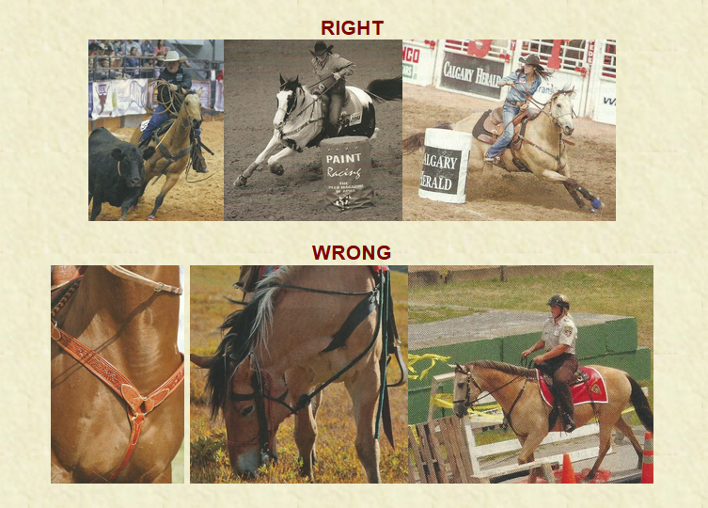
I recommend that a breast collar be removed or taken loose while a horse is grazing, watering, or even resting. I have included a few pictures of correct and incorrect breast collar placement. If you look at the buckskin in the "wrong" set, you can see how his throat is lapped over the collar. That overlap is his windpipe.
Conformation can add to this problem. The lower a horse's neck ties down into his chest, the more issues it will cause. Breast collars can be unnecessary, with the exception of decorative purposes or to hold a tie down for ropers or barrel racers. Conformation also dictates which breast collar shape is appropriate for your horse. Just like saddles, pads, spurs and breast straps; not all shapes fit every horse. For some reason, this information doesn't seem to be readily available from suppliers, stores, trainers, colleagues, or friends. So one can assume that they do not know, or do not wish to enlighten the average horse owner about the effects confirmation has on proper tack fit.

Breast collar shape is determined by how straight the shoulder is. The straighter the shoulder, the higher the tug end of the breast collar has to be.
The straighter the side pieces of the breast collar are, the lower they fit on the horse's shoulders, causing the breast collar to fall off the shoulders. The easiest breast collar to design and decorate is seen in the first picture, and is the most common sold. However, the only horse it fits is one with well laid- back, 45 degree shoulders. In today’s breeding, there are fewer of these than ever. It is still the standard for Halter and Western Pleasure because these types require a slow gait. The straighter the shoulder the faster the horse... and all performance events want speed. If you look at the middle picture, the ends curve up slightly, meaning it will fit horses with a little more straightness to their shoulders. For years, this style was the industry standard for cutters. The last picture, with the most upturned ends, is designed for horses with the straightest shoulder. Today, this is the most commonly sold breast collar for all performance horses.
Just as importantly as shape, the size of a horses shoulder matters,one size does not fit all. Generally, ponies will take a 12" shoulder. (This measurement is from fold to fold, from center D to tug D.) Small horse, like cutters, 14". Standard, or regular is 16". And large or warm-blood, 18".
CORRECT PACKING PROCEDURE
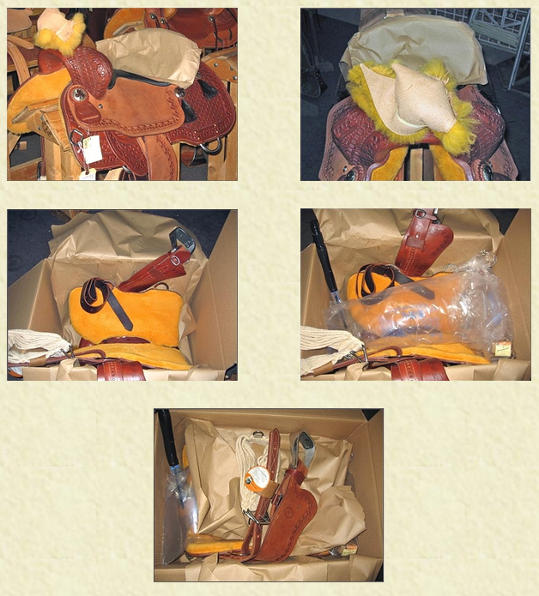

SADDLE STOOD UP ON END
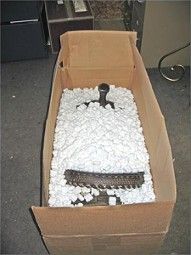
BOX TOO NARROW, BOX TOO LONG, SADDLE UPRIGHT - DON'T USE PEANUTS
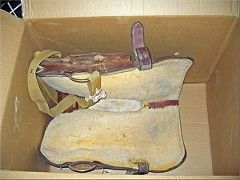
BOX TOO BIG

SADDLE UPRIGHT (SHOULD BE UPSIDE DOWN) DON'T USE PEANUTS
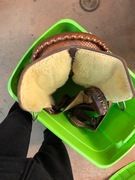
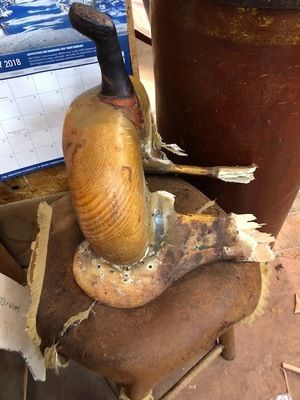
LEATHER HORNS: CORRECT MOUNTING AND SEWING
I know that this sounds like a picky little thing. But if I told you that the day you brought your new saddle home, I could tell you whether you were going to spend another $100 to $300 in repairs (even some within the next year) or not, would you be interested?
The flat-topped leather horns, as shown in Picture #1, have a projecting lower jaw. This bottom leather foundation of the horn is by nature thin and pliable; probably no thicker than 1 to 3 oz. in weight. The saddlemaker then mounts the top foundation flat on the horn head and folds the bottom up to meet the top. This creates the bulldog looking lower jaw. When there is this square projection, the palm of the riders' hand will rest against it. When held hard for events like cutting and barrel racing, it does not take long for this thin leather to wear through against the metal of the horn underneath. It can also cause pretty severe blisters. So this area will wear out while the rest of the horn is still solid and serviceable. It will have to be replaced soon or the whole top of the horn will flip or twist off.
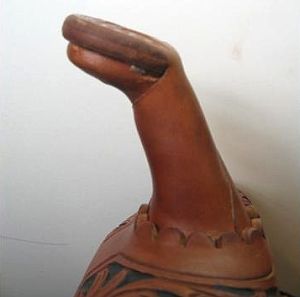

PICTURE 1
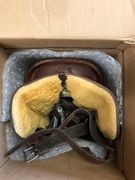
As shown in Pictures #2 and #3; when the top foundation is brought down to meet the bottom foundation at the steel horns mid-section, the thickest and strongest part of the horn will rest in the rider's hand. This area is triple thick and rounded for comfort. These horns can last 50 yrs without undo wear. The bulldog styles are doomed to failure by design and in turn....an expensive repair bill.
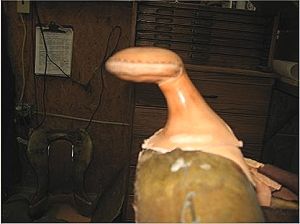
PICTURE 2
INFORMATIONAL VIDEOS
Along with all of the topics covered in the various articles above, we have provided two additional resources for our customers and anyone who is interested in learning more regarding saddle tree and saddle pad fit and bits